środa, 9 grudnia 2020

Ster. Rudder.

 Ster wycinamy ze sklejki o grubości 40 mm. Nie musimy kupować tak grubej sklejki, możemy skleić np. 4 warstwy sklejki 10 mm. Zaczynamy od wycięcia jego kształtu. Okrągłe podcięcie w miejscu poszerzenia płetwy służy temu by uniknąć zjawiska karbu i nadmiernie nie koncentrować naprężeń w okolicy dolnego zawiasu. Po wycięciu kształtu profilujemy strugiem i szlifierką dolną część steru. Wyprofilowany ster wzmacniamy obustronnie pasem tkaniny szklanej 600 G/m2.  Do laminowania używamy żywicy epoksydowej. Następnie laminujemy całą zanurzoną część płetwy do linii L. Podobnie jak w przypadku kadłuba jeżeli ster był wykonany ze sklejki mahoniowej, sosnowej lub innej o podobnej wytrzymałości to płetwę laminujemy jedną warstwą  tkaniny szklanej 200 G/m2. Jeżeli ster był wykonany ze sklejki okume to laminujemy dwiema warstwami tkaniny 600 G/m2. Nie laminujemy steru powyżej linii L. Teraz możemy ster poszpachlować używając żywicy epoksydowej zagęszczonej mikrobalonami. Taką lekką szpachlówką wypełniamy również okrągłe podcięcie. Szlifujemy całość. Część steru powyżej linii L zabezpieczamy głęboko penetrującym lakierem epoksydowym. Następnie malujemy cały ster lakierem poliuretanowym z filtrem UV. Ścianki wszystkich otworów które wywiercimy w sterze nasączamy kilkakrotnie głeboko penetrującym lakierem epoksydowym. Zawiasy przykręcamy na szczeliwo elastyczne (np. sikaflex 291). Ster po zamontowaniu powinien się poruszać bardzo lekko. Jeżeli nie udało się precyzyjnie przykręcić zawiasów to można zmniejszyć (nawet o 1 mm) średnicę sworzni zawiasów steru.

The rudder is cut out of plywood 40 mm thick. We do not have to buy such a thick plywood, we can glue, for example, 4 layers of 10 mm plywood. We start by cutting out its shape. The circular undercut in the area of ​​the fin widening serves to avoid the notch phenomenon and not to concentrate the stress excessively in the area of ​​the lower hinge. After cutting the shape, we profile the lower part of the rudder with a plane and grinder. The profiled rudder is reinforced on both sides with a 600 G / m2 glass fabric belt. We use epoxy resin for laminating. Then we laminate the entire submerged part of the fin to the L line. As in the case of the hull, if the rudder was made of mahogany, pine or other plywood of similar strength, we laminate the fin with one layer of 200 G / m2 glass fabric. If the rudder was made of okume plywood, we laminate with two layers of 600 G / m2 fabric. We do not laminate the rudder above the L line. Now we can smoothen the rudder using epoxy resin thickened with microballoons. We also use this light putty to fill the round undercut. We sanding the whole rudder. The part of the rudder above the L-line should be painted with deep penetrating epoxy paint. Then we paint the entire rudder with polyurethane varnish with a UV filter. The walls of all holes that we drill in the rudder are soaked several times with deeply penetrating epoxy varnish. Screw the hinges onto the flexible sealant (e.g. sikaflex 291). After assembly, the rudder should move very easily. If it is not possible to precisely screw the hinges, the diameter of the rudder hinge pins can be reduced (even by 1 mm).

Wycinamy ster. Strzałka pokazuje okrągłe podcięcie.
We cut the rudder. The arrow shows a circular undercut.


Profilujemy płetwę steru.
We profile the rudder fin.


Laminujemy pas wzmacniający.
We laminate the reinforcing belt.
Laminujemy płetwę.
We laminate the fin.

Szpachlujemy ster i wypełniamy szpachlówką podcięcie.
We putty the rudder and fill the undercut with putty.


Pomalowany ster schnie.
The painted rudder is drying.


Dobrze widać wyprofilowanie płetwy.
The profiling of the fin is clearly visible.


Sklejony rumpel.
Bonded tiller


Montaż zawiasów.
Hinge assembly.


niedziela, 6 grudnia 2020

Malowanie kadłuba. Painting the hull.

 Przed malowaniem każdy kawałek drewna  należy zabezpieczyć bezbarwnym, wodorozcieńczalnym preparatem przeciwgrzybicznym. Po wyschnięciu sklejkę i drewno malujemy bardzo rozrzedzonym lakierem epoksydowym. Aby lakier wniknął głęboko w pory drewna mieszamy go z rozcieńczalnikiem nawet 1:1. Następnie malujemy mniej rozrzedzonym lakierem epoksydowym. Lakiery epoksydowe maja zazwyczaj niewielką odporność na promieniowaniw UV więc ostatnią warstwę malujemy lakierem poliuretanowym. Zewnętrzną stronę kadłuba polaminowaną epoksydem możemy od razu malować lakierem poliuretanowym. Poniżej kilka zdjęć z malowania Trekki.

Before painting, each piece of wood should be protected with a colorless, water-soluble antifungal agent. After drying, paint the plywood and the wood with thinned epoxy varnish. In order for the varnish to penetrate deep into the pores of the wood, we mix it with a thinner even 1: 1. Then we paint with a less thinned epoxy varnish. Epoxy varnishes usually have a low resistance to UV radiation, so paint the last layer with polyurethane varnish. The outer side of the hull, coated with epoxy, can be painted immediately with polyurethane varnish. Below are some pictures of Trekka's painting.


Bulbkeel

 Bulbkil

Balast Globe 5.80 składa się ze stalowej spawanej płetwy oraz przykręconego ołowianego bulba. Kil ma mocną konstrukcję i nie ma obawy o jego uszkodzenie przy zderzeniu z przeszkodą. Bulbkil jest przykręcony do bardzo mocnej części dna. Takie rozwiązanie wytrzymuje bez awarii wielogodzinne tłuczenie kilem o dno po wejściu na mieliznę. Na co trzeba szczególnie zwrócić uwagę wykonując płetwę? Bardzo ważne jest by spawa między płetwą a jej kołnierzem był dobrze położony i miał wymiar jak w dokumentacji. Druga bardzo ważna rzecz. Najpierw wywierćcie otwory w dennikach a dopiero potem odwzorujcie je na kołnierzu płetwy. Tutaj bulb został odlany z ołowiu przez profesjonalistów. Jak zrobić bulb w warunkach domowych możecie zobaczyć tutaj   http://setkaatlantyk.blogspot.com/2012/10/  .  Aby przykręcić bulb trzeba wywiercić otwory w ołowiu. Wierćcie na niskich obrotach i polewajcie wiertło i otwór wodą.

Bulbkeel

Globe 5.80 ballast consists of a steel welded fin and a bolted lead bulb. The keel has a strong construction and there is no fear of damaging it in the event of a collision with an obstacle. Bulbkil is bolted to a very strong part of the bottom. This solution can withstand many hours of the keel being hit on the bottom without failure after running aground. What do you need to pay special attention to when making a fin? It is very important that the weld between the fin and its flange is well make and has the dimensions as in the documentation. The second very important thing. First, drill holes for the mounting bolts in the bottom floor and only then trace them to the fin flange. Never the other way around. Here, the bulb was cast from lead by professionals. You can see how to make a bulb at home here http://setkaatlantyk.blogspot.com/2012/10/.  To screw the bulb on, you need to drill holes in the lead. Drill at low speed and pour water over the drill bit and hole.

Bardzo ważny spaw
A very important weld


Sklejkowy model płetwy pozwala sprawdzić czy będzie dobrze przylegała do dna.
The plywood model of the fin allows you to check whether it will stick well to the bottom.


Płetwa po ocynkowaniu
The fin after galvanization


model bulba
bulb model


Bulb odlany z ołowiu
The bulb is made of lead


Jak przygotować płetwę do przykręcenia.
How to prepare a fin for screwing.


Do dna przymocowałem pasek cienkiej (4mm) sklejki. Od wewnątrz, przez denniki wywierciłem otwory na szpilki balastowe. Po zdjęciu paska sklejki otrzymałem szablon oddający dokładne rozmieszczenie otworów od zewnętrznej strony dna.
I attached a strip of thin (4mm) plywood to the bottom. From the inside, I drilled holes for ballast screws through the floors. After removing the plywood strip, I received a template showing the exact location of the holes on the outside of the bottom.


Szablon przymocowałem do kołnierza płetwy.
I attached the template to the fin.


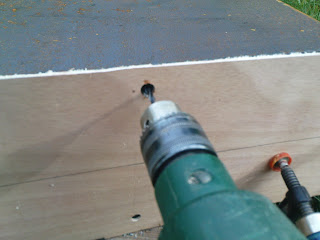
Powierciłem
I drilled with a thin drill


a następnie przewierciłem otwory w stalowym kołnierzu.
and then drilled holes in the steel collar.


Szlifierką kątową zaokrągliłem krawędzie płetwy.
I rounded the edges of the fin with an angle grinder.


Płetwa i otwory precyzyjnie pasowały do kadłuba.
The fin and the holes fit the hull precisely.